Beranda
/ How To Apply Vinyl Decal To Cup / How To Put Vinyl On Cups And Tumblers So It S Straight Silhouette School : I like to use the backing paper to burnish the edges to make sure that it sticks well.
How To Apply Vinyl Decal To Cup / How To Put Vinyl On Cups And Tumblers So It S Straight Silhouette School : I like to use the backing paper to burnish the edges to make sure that it sticks well.
Insurance Gas/Electricity Loans Mortgage Attorney Lawyer Donate Conference Call Degree Credit Treatment Software Classes Recovery Trading Rehab Hosting Transfer Cord Blood Claim compensation mesothelioma mesothelioma attorney Houston car accident lawyer moreno valley can you sue a doctor for wrong diagnosis doctorate in security top online doctoral programs in business educational leadership doctoral programs online car accident doctor atlanta car accident doctor atlanta accident attorney rancho Cucamonga truck accident attorney san Antonio ONLINE BUSINESS DEGREE PROGRAMS ACCREDITED online accredited psychology degree masters degree in human resources online public administration masters degree online bitcoin merchant account bitcoin merchant services compare car insurance auto insurance troy mi seo explanation digital marketing degree floridaseo company fitness showrooms stamfordct how to work more efficiently seowordpress tips meaning of seo what is an seo what does an seo do what seo stands for best seotips google seo advice seo steps, The secure cloud-based platform for smart service delivery. Safelink is used by legal, professional and financial services to protect sensitive information, accelerate business processes and increase productivity. Use Safelink to collaborate securely with clients, colleagues and external parties. Safelink has a menu of workspace types with advanced features for dispute resolution, running deals and customised client portal creation. All data is encrypted (at rest and in transit and you retain your own encryption keys. Our titan security framework ensures your data is secure and you even have the option to choose your own data location from Channel Islands, London (UK), Dublin (EU), Australia.
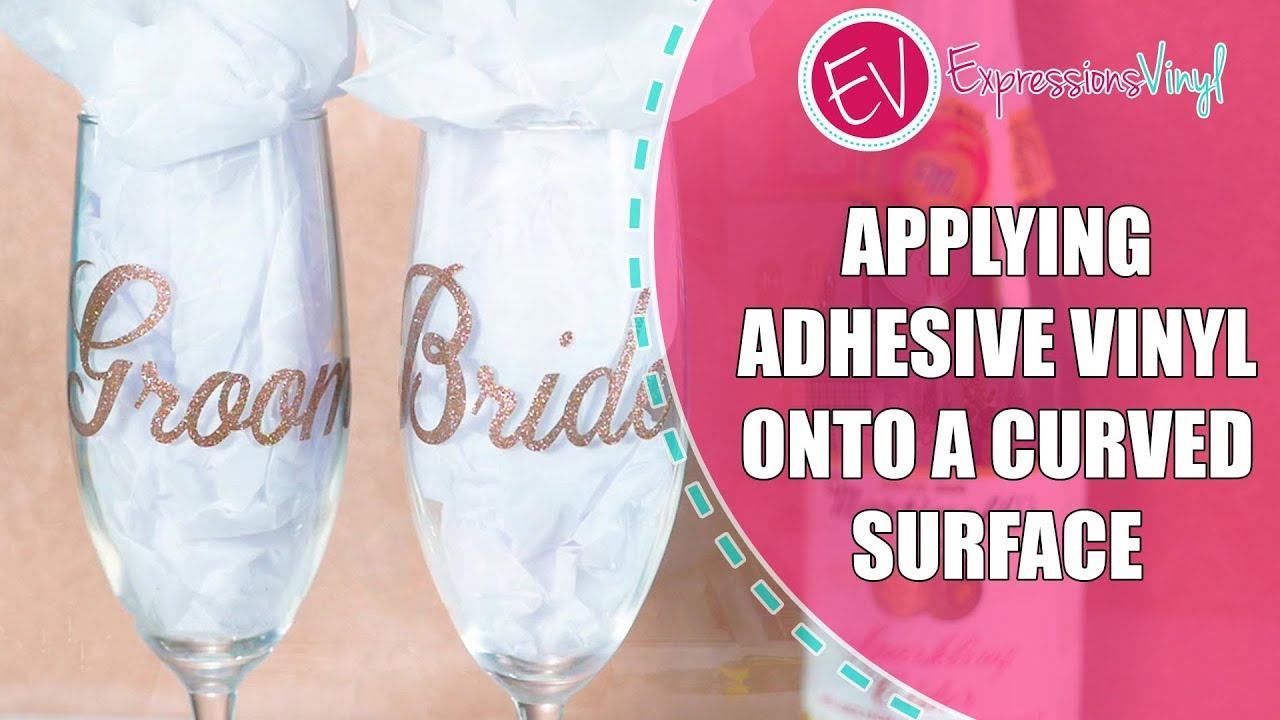
How To Apply Vinyl Decal To Cup / How To Put Vinyl On Cups And Tumblers So It S Straight Silhouette School : I like to use the backing paper to burnish the edges to make sure that it sticks well.. If it's too sticky, the vinyl will. Follow these simple steps and tips make it an easy process! Press from the middle first, and then slowly out to the edge. It can get a little tricky when you apply a decal with words to a tumbler since a tumbler is a curved surface and the words of the decal are meant to be straight. Spray the surface you'll be applying the decal to with the soapy water mixture until it's soaking wet.
How to apply a custom vinyl decal to a yeti cup! Position it over the cup where you want to apply it, then press the design and transfer tape down to stick it on. Then load your mat and push the start button when prompted. Place down the decal and firmly press it on the tumbler. After your vinyl is cut, press the unload mat button to release your mat.
How To Easily Apply Vinyl To Curved Surfaces Vinyl On Mugs from i.ytimg.com Saved by the pixel llama. Clean the surface of your mug with 91% isopropyl alcohol. Here is the easy part! Peel the transfer tape up, lifting your vinyl away from the paper backing. Decals without application tape are decals that are easier to apply one component at a time. Spray the surface you'll be applying the decal to with the soapy water mixture until it's soaking wet. Remove the transfer tape and vinyl decal from the backing. Let the adhesive cure for at least 24 hours before washing.
Peel off the transfer tape.
If it's too sticky, the vinyl will. Carefully position and then lay the transfer tape onto your mug or cup. Here is the easy part! Then load your mat and push the start button when prompted. Make sure to watch the video at the end. So today i'm going to show you how to make this tumbler holder that will make applying vinyl super easy. Peel the transfer tape up, lifting your vinyl away from the paper backing. Depending on your design and where you have cut your slits, press your design down in sections. Spray the surface you'll be applying the decal to with the soapy water mixture until it's soaking wet. If you're customizing that mug to gift it to someone special, sealing the vinyl will ensure you give them a quality gift that lasts a lifetime. Tape the decal at the top edge using the biggest masking tape you can find. Use your fingers or application tool to smooth out any little bubbles. Prepare your decal for transfer before transferring your decal, snip small slits into your transfer tape.
Saved by the pixel llama. If it's too sticky, the vinyl will. Vinyl decal size chart for cups. Follow these simple steps and tips make it an easy process! ⭐️ making a 6 x 6 decal using black oracal 651 from speedy vinyl.
How To Make And Apply Vinyl Decals With Cricut Youtube from i.ytimg.com Use your fingers or application tool to smooth out any little bubbles. Fold over one side of the decal and peel it off the backing. After your vinyl is cut, press the unload mat button to release your mat. How to apply vinyl decals each decal will arrive as three layers of material. This decal application instruction printable is the perfect item to add to your adhesive vinyl decal orders. You are only using 1/4 of 1 sheet ( 1/4 x $0.44 = $0.11 worth of vinyl) 1/4 because the sheet is 12 x 12 and your decal is 6 x 6 Many crafters have reported cases of the vinyl coming off their mugs. Smooth the vinyl on to the mug on the other side using the same method you used before.
That means 1 sheet cost $0.44.
Tape the decal at the top edge using the biggest masking tape you can find. They can really stand out if only on the vinyl, but it looks like it was meant to be that way if you cover the whole mug. Free 5 day master your cricut challenge: Next, use a weeding tool to weed away and excess vinyl and apply your decal to the transfer tape. Decals without application tape are decals that are easier to apply one component at a time. Run your scraper over the transfer tape pushing the vinyl onto the mug. It can get a little tricky when you apply a decal with words to a tumbler since a tumbler is a curved surface and the words of the decal are meant to be straight. About press copyright contact us creators advertise developers terms privacy policy & safety how youtube works test new features press copyright contact us creators. Position it over the cup where you want to apply it, then press the design and transfer tape down to stick it on. After your vinyl is cut, press the unload mat button to release your mat. Saved by the pixel llama. That means 1 sheet cost $0.44. Remove (below) transfer tape slowly, pull diagonally from one corner.
They can really stand out if only on the vinyl, but it looks like it was meant to be that way if you cover the whole mug. You are only using 1/4 of 1 sheet ( 1/4 x $0.44 = $0.11 worth of vinyl) 1/4 because the sheet is 12 x 12 and your decal is 6 x 6 Cricut explore® makes it easy to get the perfect cut every time. That means 1 sheet cost $0.44. It can get a little tricky when you apply a decal with words to a tumbler since a tumbler is a curved surface and the words of the decal are meant to be straight.
Car Decal Vinyl Decal When In Doubt Travel Vinyl Decals Cup Decal Home Living Wall Decor from ae01.alicdn.com Apply a strip of painter's tape down the middle of the decal. ⭐️ making a 6 x 6 decal using black oracal 651 from speedy vinyl. Spray the surface you'll be applying the decal to with the soapy water mixture until it's soaking wet. The top layer is paper transfer tape, which is used to apply the decal.the second layer is the vinyl film, which is the decal itself.the bottom layer is the backing paper.when you receive your decal in the mail, lay it flat and firmly wipe a credit card or application squeegee across the top of. Line up the decal on the tumbler and apply the design. We recommend that you cover the entire mug and not just the decal because you will see some little brushstrokes. This will remove any oil or dirt and get the surface as clean as possible. How to apply a custom vinyl decal to a yeti cup!
How to apply vinyl decals each decal will arrive as three layers of material.
Continue holding the sticker securely as you place it on a wet or dry surface. To seal vinyl decals on mugs, simply cover the entire mug with some dishwasher safe mod podge. I like to use the backing paper to burnish the edges to make sure that it sticks well. Fold over one side of the decal and peel it off the backing. Smooth the vinyl on to the mug on the other side using the same method you used before. Decals without application tape are decals that are easier to apply one component at a time. If your vinyl is not releasing from the transfer tape then your transfer tape may be too sticky! Make sure it is good and stuck. Use your application tool/old credit card to burnish the vinyl onto the mug. Pick up transfer tape and make sure the whole tumbler decal is stuck to it. Remove (below) transfer tape slowly, pull diagonally from one corner. Peel the vinyl decal component off the backing. Clean the surface of your mug with 91% isopropyl alcohol.